")

In order to really show off your van life eats you should really learn how to photograph food with a mobile phone inside a campervan.
These days the cameras on mobile phones are amazing and can take some incredibly professional looking photograhs, of course if you have an all singing and dancing DSLR you probably have a good idea what you are doing anyway.
Giving the space limitations of van life, you simply won’t have enough space to store photography lights, tripods and large soft boxes so it can really be a challenge to make the shot look professional.
The secret in taking professional food photographs on your mobile phone is in knowing how to use the advanced phone camera settings on your phone, being able to use as much natural light as possible and knowing how to compose your shots.
In this article I am going to talk you through each setting on your phone, van life composition and give you a blueprint of how to photograph food with a mobile phone inside a campervan.
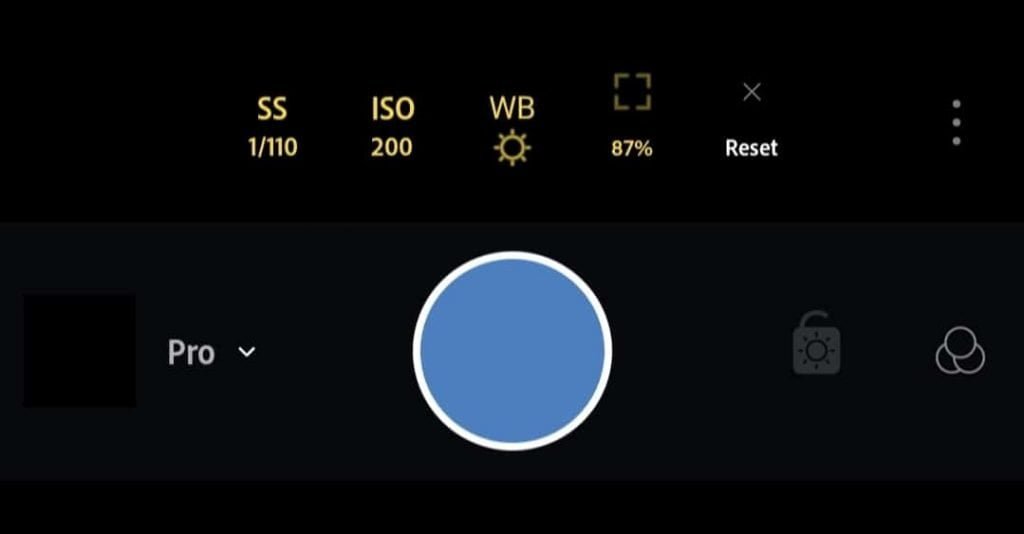
Pro mode
Before diving in and taking photos you need to turn your phone camera settings to “Pro mode” right now! Get familiar with what each setting does and practice on anything in front of you.
It’s never very nice when you’ve taken so long taking the photos that the food then becomes stone cold and not as enjoyable to eat after the shoot. Be warned, you will most likely need to reheat it or eat it only warm.
Most cameras these days will all have the same settings but I am going to reference a completely free app that I use to take my photos with – Adobe Lightroom CC.
With this app you can quickly and easily access the pro features that will take your photos to the next level.
If you don’t want to try it then you can still access most of these settings using your default phone camera.
Shutter Speed – SS
This is often a setting you won’t need to worry too much about with food photography as it is a setting to adjust the length of time the photograph is being taken for. As food is nearly always static then you will only need to adjust the shutter speed to suit the lighting scenario.
You do have one very nice advantage of taking photographs in your campervan and that is the availability of natural light.
Opening the side door every time you take a photo will let floods of natural light in and this will allow you to set your shutter speed to a nice fast setting that will give you a nice crisp photograph.
There are some food photographs where you might want to capture the feel of motion and that is shots such as pouring sauces or liquids.
Having a fast shutter speed will freeze the motion of the pour and give a crisp motion, having a slower shutter speed will give a smoother capture of the motion of the pour. It will add more mood to the photo. Get creative and practice!
When adjusting the shutter speed it will then alter the amount of light that is let in for the photograph, therefore you need to compensate this. Some cameras will have an”aperture” setting but this is rare on a phone so I will move on to adjusting the ISO.
ISO
ISO is the setting that will brighten and darken a photo. Increasing the ISO number will progressivley brighten your photo. This will give you the option of shooting in dark environments and be able to take photos without the aid of a tripod. However, increasing the ISO comes at a price as it will deteriorate the quality and add noise.
As detail and texture is an important factor in food photography, I will advise that you try and keep the ISO number as low as you can possibly get away with.
With the Adobe Lightroom CC app you will want to keep the slider as far to the right as possible giving you an ISO reading of as low as 45.
If you want to give your image a gritty effect then you could try playing around with high ISO numbers and fast shutter speeds but remember you can always add this type of effect afterwards.
White Balance – WB
White balance is what determines what is true white within your photograph in different environments such as daylight, cloudy, fluorescent light and incandescent. It will affect the colour temperature of your photograph but most importantly it will help obtain the true natural colours.
Food is often colourful and vibrant so it’s important to get this right but thankfully you do have some adjustment in the post production editing stages.
You will see several settings under WB and this relates to what environment you are shooting in, simply select the lighting scenario that fits best.
Some Pro mode mobile phone cameras will have a slider to adjust the white balance. This usually ranges from 2300k (cooler) to 10000k (warmer).
You may also find that you have an eyedropper tool that allows you to select a white object within your environment to tell the camera what white should look like.
Before you take your main photo simply hold up a piece of paper and select that as white and viola your colours will look natural.
AWB (auto white balance)
This setting will take a reading from your lens and automatically set the white balance accordingly.
This is great if you are only taking one shot but if you are taking multiple shots you should consider setting this manually to keep the colour temperature even and consistent across every image. A valuable tip for when it comes to bulk processing your photos!

Aperture
This isn’t always a clear setting on a mobile phone and is usually always only visible in the advanced settings.
The aperture is the size of the hole in the lens shutter that lets the light in. The larger the hole the better for focusing on single objects in the foreground and the smaller the hole the better for focusing on multiple objects and background detail.
The larger the aperture is how you obtain an in focus object with a nice blurred background, which can be fun to play with when it comes to food photography. Be careful though as this is yet another setting you can’t fix in post production. Once it’s blurred it’s blurred!
This is yet another setting that will let more light into the photograph so compensate this with your ISO and shutter speed settings.
Lighting
Learning how to photograph food with a mobile phone inside a campervan does have its limitations and lighting is definitely one.
It’s unrealistic to consider traveling with much if any professional lighting equipment as it can be heavy, bulky and power consuming.
Make the most of the natural light that can flood through your van when you open curtains, shutters, skylights and best of all the main van doors. This will give you the perfect lighting to get some beautiful food photography within your van.
Shadows
One of the biggest problems you will come across is the shadow of your hand and phone looming over the food when you want to take the photo.
Usually this is when you would counter the light direction with an additional light source so you may need to experiment with closing the backdoors or closing a curtain to balance the flood of light. Don’t forget the direction of the shadow will change depending on what time of day it is.
I have a very small battery powered LED light that I use as an occasional night switch. This comes in very handy as a subtle fill light to hide that shadow. Remember not too harsh a light source or it will blow out the highlights in your photo.
You would angle the fill light to the side and above of the image in a position that moves the angle of the shadow down and out of view.
Avoid flash
Whatever you do, keep that phone flash light off. It will never give you a professional looking photograph and will over expose all of the highlights in your shot and you will lose texture and detail!
Camera effects
Avoid at all costs! You can always add an effect afterwards but you won’t be able to remove them if you shoot with an effect already active!
People like to see food look natural and edible. Effects will honestly make your food look less desirable.
Composition
How to arrange a plate of food for the perfect photograph?
In order to get the best composition for your van food photography you need to consider the height, shape and quantity of elements within the composition.
Does your recipe have many elements that sit alongside the main dish? If so then you will need to plan both your arrangement and camera angle to suit. Perhaps an overhead shot would work well to fit all the elements in-shot.
Some shapes simply will not work with a side on shot whilst others will only work with side on shot. I will cover angles in more detail in a moment.

Rule of thirds
What is the rule of thirds? Maybe you’ve heard of this, and you may well have seen the gridlines on your camera screen or viewfinder, I will now explain what they are for.
The rule of thirds is a set of guidelines that separates the image into thirds both horizontally and vertically leaving you with 9 guidelines to guide you in placing the eye catching elements of your photo.
It can work particularly well for arranging the composition of your shot especially in food photography.
The aim is to place the most eye catching and most desirable focal points in one of the areas where the guidelines cross. This could be the centre of the dish for example.
Another use for the guidelines is the horizontal and vertical guides. These are never dead center as this isn’t deemed as an interesting focal point. These lines work very well for lining up with table surfaces.
You can often toggle the rule of the thirds on and off within your camera phone settings. I personally leave them on as they help me think about the composition a little more.
Camera Angles
What are the best camera angles for photographing food in a campervan?
Being in a confined space such as a campervan can be restricting on what angles are possible when photographing food. There are 4 best angles to consider when photographing food in a campervan.

45 Degree Angle
This is probably the most common angle to photograph a table of food at, but is actually very challenging to do on a mobile phone.
The standard lens on a camera phone is usually a wide angle lens so unless you either get in really close or use the zoom feature your 45 degree shot won’t look right.
To get the best 45 degree angle photographing food with a mobile phone camera you should pinch zoom your camera ever so slightly to bring the lens out of a wide angle. Using the zoom feature on your phone can deteriorate your image quality so only zoom in very lightly!
It’s possible to get a very professional looking shot at this angle.
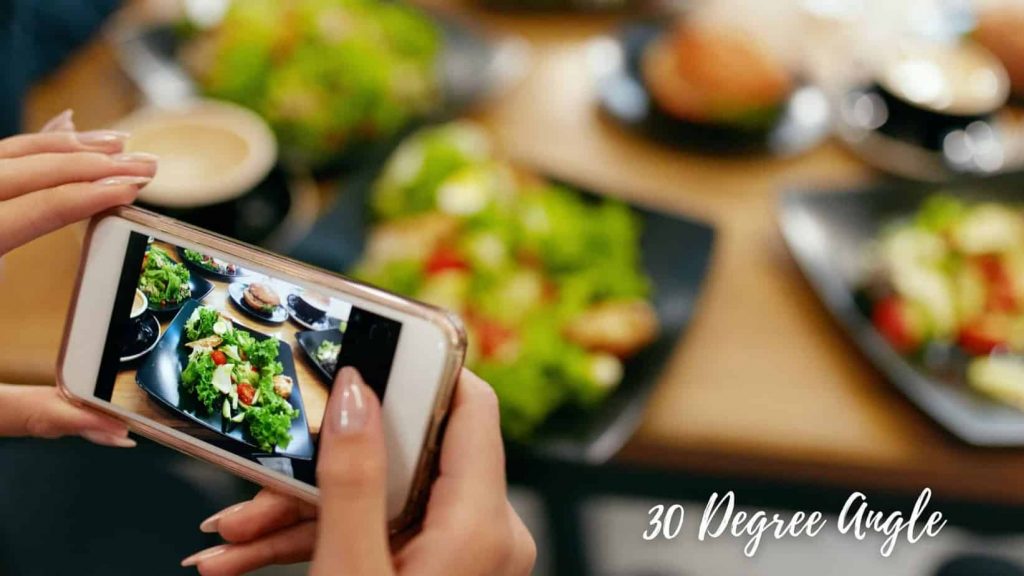
Shooting Low
This is a similar style to the 45 degree angle shot but when the spread of food on the table allows it you can lower the camera to a slightly lower 30 degree angle.
This will allow you to bring further depth to the arrangement of food on the table and it can also give you some creative opportunities to capture some out of focus background showing off some of your campervan interior.
Shooting low will involve having flat plates on the table and is almost not a viable option with bowls as it will be hard to see over the top and into the bowl where the yum is hiding.
Shooting Straight-on
This is another great shot for including the background of your campervan.
The straight on food shot is a classic for burgers and sandwiches and can help give the sense of height to the food.
The horizon lines we spoke of earlier for the rule of thirds can be essential here. Keeping the horizon lower than central will give the photograph it’s height.
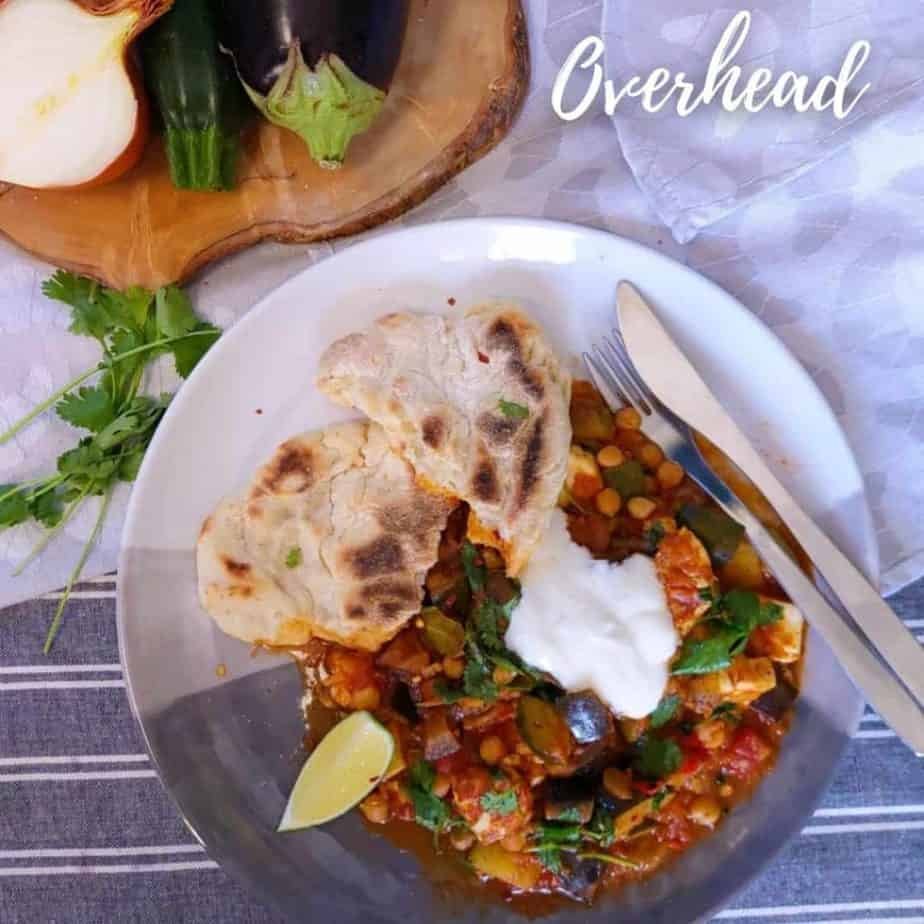

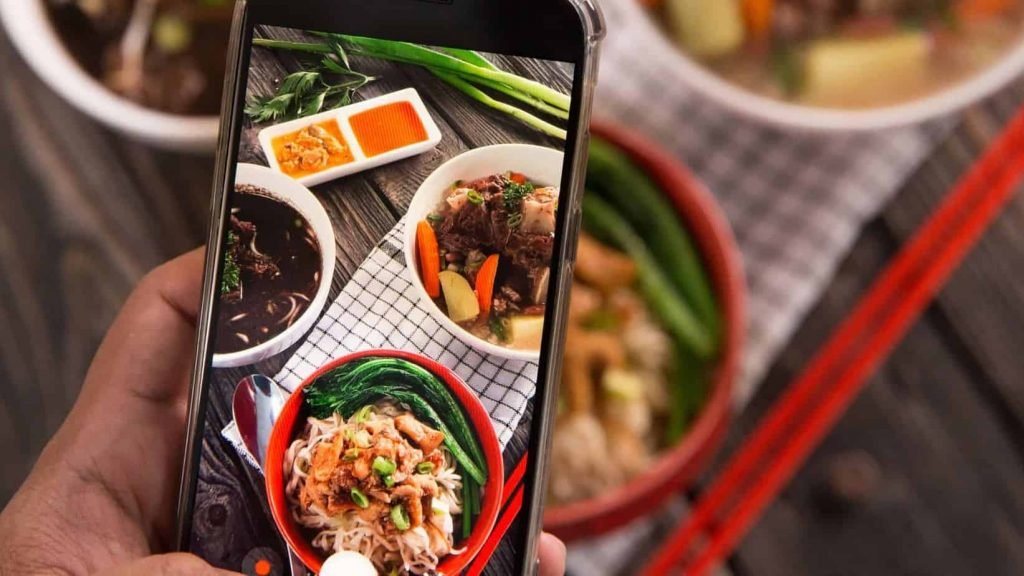
The Overhead Shot
The overhead food photo is another classic and is used time and time again for blogs.
It is often a very fun way to arrange the table with scattered vegetables, sprinkles of salt, little pots of sauce and a screwed up tea towel for example.
A busy and almost messy collective can look hearty and homely and make a very interesting shot.
The overhead shot is a great shot to do inside a campervan as it can make a much less invasive shot should you need to avoid having the clutter of your van in frame.
This shot is the most challenging when it comes to shadows. Be aware of the shadow of your hand and mobile phone creeping in over your dish!
Setup your food arrangement next to or under a window to get the most amount of natural light. I even open the side door to really brighten up the inside of the van.
Mix it up
With these 4 different angles you should have enough of a repertoire to keep your photo angles varied enough. There’s nothing worse than repeating the same shot over and over again.
Keep it interesting and make each shot stand out from the last!
Arranging the table
This is one of my favourite parts but can be very limiting in a van. It’s not like you will be carrying a varied selection of plates and bowls to mix up your arrangements.
I am always scouting the charity shops for rustic and interesting pots, plates and bowls but when I am busy moving around in my van then I don’t carry everything with me and my shots tend to contain the same grey or yellow bowl.
Still it’s a lot of fun scattering chopped ingredients around the table, screwed up tea towels and making the table look like there’s a mini banquet going on.
Keep it interesting and use that rule of thirds to keep the focus on the main show feature (main dish).
Keep it clean
Cooking in a van or anywhere limited on space is a challenge to keep tidy and clean. If you are going to photograph your culinary skills then you are going to need to be extra organised.
Nobody will want to see spills, smears and greasy fingerprints in the photo. Even for the most rustic of shots!
Before you start any cooking ensure your van is tidy and you have plenty of space to prepare, cook and of course photograph.
Check your phone camera lens
This has been a mistake I’ve made in the past and it can really ruin your shot if not noticed early enough.
Greasy fingerprints on the lens! Keep checking and wiping the lens regularly.
If your shot looks blurry and not very sharp, the chances are there was a fingerprint on the lens!
Additional Equipment
What is the best equipment to buy to photograph food with a mobile phone inside a campervan?
I can keep this short and sweet as I hope the above knowledge has explained to you how you can take amazing photos with “only” your mobile phone.
You just dont want to carry all the gadgets in your van and cause clutter, weight and risk of theft.
However, there are only a couple of additional accessories that come in handy and our space-saving enough to pack away neatly without weighing much at all.
Compact 5 in 1 Light Reflector

Remember I spoke about shadows invading your photograph? Using one of these reflectors is ideal for being able to cancel out the shadows caused with your light source only being thrown in one direction.
This 5 in 1 solution will also act as a diffuser that you place against your window softening and evenly spreading the sunlight.
Long reach mobile phone tripod
I often find that I need to lower my shutter speed in order to get a better quality image or to capture some smoothness to the photo and the only way to avoid camera shake is to mount the phone on a tripod. Make sure it is long enough to reach the table and angles you want!
It also comes in really handy for video should you be lookng at filming your recipes.

Summary
Taking a good photograph of food on a mobile phone in your campervan can be a simple as a quick capture before you tuck in.
If you are looking to really impress then following this guide will certainly help you take your van life food photography to the next level.
To summerise how to photograph food with a mobile phone inside your campervan:
- Learn to use the Pro mode
- Utilise as much natural light as possible
- Avoid ALL in-camera effects
- Use the rule of thirds
- Practice each of the 4 common angles
- Be tidy and organised
- Keep your lens clean!
I have been a photographer for the last 11 years. 7 of which a full-time professional photographer. Since starting van life I no longer wish to carry expensive cameras and equipment and I now only shoot on my camera phone.
If I can help with any tips or tech feel free to ask away. I love chatting photography.
Best of luck
Mark


0 Comments